In
The Ghost in the Machine the Grand Illusion of Consciousness, I used some screenshots from my then favorite astronomical simulation software known as Redshift 1.0. Since then, I upgraded to Redshift 7.0 many years ago. You can now get Redshift 8 Premium for $59.99 at:
Redshift 8 Premium
http://www.redshift-live.com/ext/en/
Redshift 8 Premium is a real bargain, but today, I would like to feature the spectacular free astronomical simulation software known as the WorldWide Telescope or the WWT. The WWT was originally a joint venture between Microsoft Research and the Johns Hopkins University back in 2002. Since then it has become an open source application that is managed by the American Astronomical Society. You can read more about the WWT on the Wikipedia at:
WorldWide Telescope
https://en.wikipedia.org/wiki/WorldWide_Telescope
You can download the WWT software for Windows at the Homepage for the WWT at:
WorldWide Telescope
http://www.worldwidetelescope.org/home
The most impressive thing about the WWT software is that it uses actual digitized astronomical images, rather than simulated images. The WWT software also lets you add additional imagery by importing "Layer" files into the software. So the WWT software is also very useful for professional astronomers and educators. For example, astronomers can import Layer files with research data and educators can use the software to create their own Tours of the Universe for the classroom.

Figure 1 – When you start up the WWT software you see the WWT Console.
What I really love about the WWT software is that you can create a "Reference Frame". A Reference Frame is a location in our Solar System, like a particular place on the Earth, or one of the other planets in our Solar System. You can also create a Reference Frame on the Earth's Moon and some of the other moons of the other planets. Once you have created a Reference Frame, you can then have the WWT software "Track this frame". That puts you at that place in the Solar System and you can then see the sky from that location from any time between 1 AD - 4,000 AD.

Figure 2 – Sunrise over my hometown of Roselle, Illinois.

Figure 3 – Sunrise over the Grand Canyon.

Figure 4 – Sunrise over the Valles Marineris on Mars.

Figure 5 – Sunrise over the Valles Marineris on Mars with the atmosphere removed.
As an example, let us establish a Reference Frame on the Earth's Moon in a prominent crater and then Track the Reference Frame for it. To do that go into Solar System mode and fly to the Moon by clicking on the Moon in the Context tabs at the bottom of your screen. Then PG DN until you find a prominent crater. Next go to the Earth in the Layer Manager on the left side of your screen. Then navigate to Earth -> Moon. Right-click on the Moon and select New Reference Frame. Click through the dialog boxes using all of the default settings. When you get to the Position dialog box, click on the Get From View button. Then navigate to the Earth -> Moon in the Layer Manager on the left side of your screen and right-click on the new Reference Frame that you created on the Moon. Then right-click on the new Reference Frame and select the Track This Frame option. That brings us to the following View:

Figure 6 – Tracking a Reference Frame in the bottom of a prominent crater on Earth's Moon.
Now we can zoom out from that reference frame in a number of steps using the PG UP key on your computer.
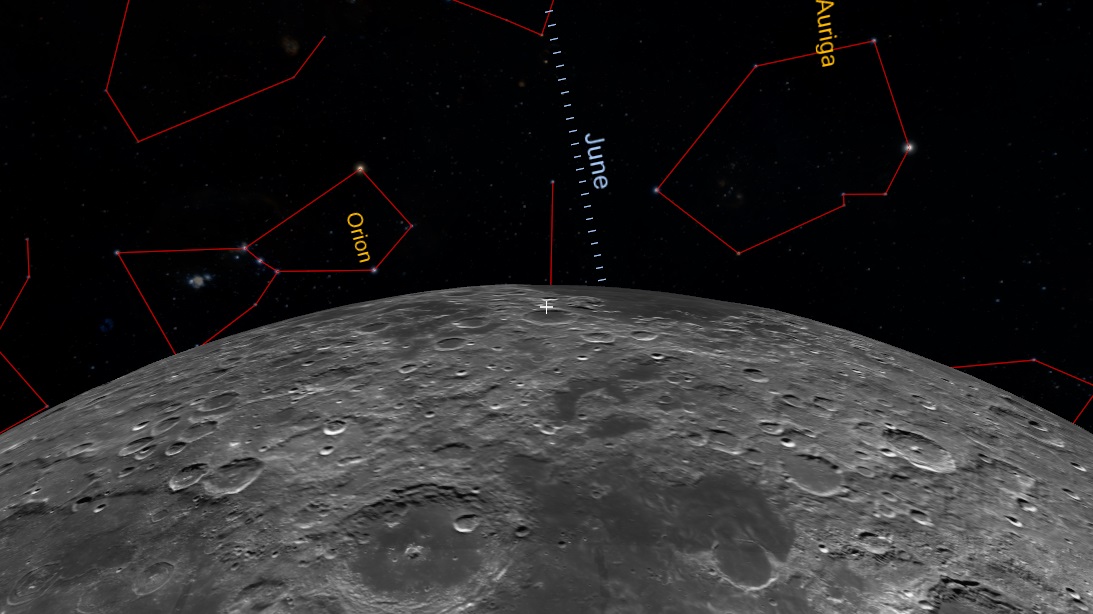
Figure 7 – Tracking a Reference Frame in the bottom of a prominent crater on Earth's Moon, but at a higher altitude.

Figure 8 – Tracking a Reference Frame in the bottom of a prominent crater on Earth's Moon, but at an even higher altitude.

Figure 9 – Tracking a Reference Frame in the bottom of a prominent crater on Earth's Moon, higher still.

Figure 10 – In Sky mode, you can view our Milky Way galaxy and all of the stars that are in the Digitized Sky Survey and other sky surveys recorded in differing bandwidths of the electromagnetic spectrum.

Figure 11 – You can also zoom in to see that our Milky Way galaxy is composed of a huge number of stars.

Figure 12 – In the Solar System mode you can fly around the Solar System and view the planets and some planetary satellites like our Moon.

Figure 13 – Or Mars

Figure 14 – Or Saturn

Figure 15 – When flying over a planet, use your arrow keys to move your viewing camera north, south, east and west through space, like you are flying over the planet in those directions. Then use your ALT key and an arrow key at the same time to change the angle of your viewing camera. For example, above I am looking at Mercury, but I have tilted the viewing angle of my camera so that I am no longer looking straight down on Mercury. Instead, I used my ALT and up arrow key at the same time to tilt my camera so that I see a horizon on Mercury. If I then press my up arrow key, I will then fly over Mercury looking forward. You can use your ALT and left or right arrow keys to change the direction in which the camera is pointing. Then you can fly in that direction too.

Figure 16 – When in Solar System mode you can fly to the Earth and then PG DN for a very close look at say an elevation of 5,000 meters. Then tilt your camera angle up by pressing the ALT and up arrow keys at the same time. Then you can watch the Earth spin below you. For example, above I am watching the Alps spin by me as the Earth turns on its axis. It's amazing to see just how fast we are spinning!
While in SolarSystem mode, you can right-click on any star that you see and bring up the Finder Scope for that star. To fly to that star much faster than the speed of light, simply click on the Show Object button in the Finder Scope. This will place you 44 light years from the star. To get a closer view of the star, simply press the PG DN key on your computer to get closer, or the PG UP key to get further away from the star. The lower right-hand corner of the Context Tabs at the bottom of the screen will tell you how far away you are from the star. For example, if you want to travel out to the Pleiades open cluster of stars, simply right-click on one of the stars in the cluster and then click the Show Object button in the Finder Scope. This will bring you to within 44 light years of that star. Then you can fly around the Pleiades open cluster of stars using the arrow keys on your computer.

Figure 17 – While in SolarSystem mode, if you right-click on a star, you will bring up the Finder Scope for that star. If you then click on the Show Object button in the Finder Scope, you will fly to that star. For example, right-click on a star in the Pleiades open cluster to fly to the star in the open cluster. For some reason, the World Wide Telescope software brings you to a position 44 light years from the star. For a closer look, keep pressing the PG DN key on your computer, or the PG UP key to get further away.

Figure 18 – Once you get to the Pleiades open cluster of stars, you can fly around the open cluster of stars using the arrow keys on your computer to see the stars in the cluster from different angles.

Figure 19 – Here is the same Pleiades open cluster of stars from a different viewing angle.

Figure 20 – Then you can zoom out from our Solar System

Figure 21 – As you continue to zoom out from our Solar System the planets disappear and you begin to see the stars within the neighborhood of our Sun. As you rotate the view you will see intervening stars swinging by.

Figure 22 – As you continue to zoom out from our Solar System you will begin to see the Sun's position in the Milky Way galaxy. Again, you can rotate the view to look at the Milky Way galaxy from all sides.

Figure 23 – Even further out you can see those portions of our observable Universe that astronomers have explored. Notice the beautiful filamentary structure of the galactic clusters and the huge voids too. It turns out that our Universe seems to be much like the foam on a good glass of beer.
If you then right-click on one of the specks of light the Finder Scope will pop up. Just click on the Show Object button in the Finder Scope and you will fly to that speck of light at a huge velocity. The speck of light will turn out to be a galaxy! The WorldWide Telescope software will bring you to a point that is 3 megaparsecs, about 10 million light years, from the galaxy. Once again just use your PG DN and PG UP keys to get closer or further away from the galaxy.

Figure 24 – You can fly to a galaxy by pressing the Show Object button on the Finder Scope. Just right-click on one of the specks of light to bring up the Finder Scope on it.

Figure 25 – If you right-click on one of the bigger specks of light and then the Show Object button on the Finder Scope, you will fly to a cluster of galaxies. You can then use your arrow keys to spin around the galactic cluster or use your PG DN or PG UP keys to move closer or further away from the galactic cluster. It is hard to imagine that each blob of light in the above figure is a galaxy consisting of hundreds of billions of stars!
I could go on and on, but the best way to learn about what the WWT software can do is to download it for yourself and play around with it. There are also some very helpful manuals at:
WWT User Guides
http://www.worldwidetelescope.org/Learn/UserGuide
I found the User Manual and the Advanced Guides manuals the most useful. So I highly recommend that you give the WWT software a try. The WWT software is a beautiful example of software at its best.
Comments are welcome at scj333@sbcglobal.net
To see all posts on softwarephysics in reverse order go to:
https://softwarephysics.blogspot.com/
Regards,
Steve Johnston